Quick Summary: Dried beans have superior flavor and texture but require more time. Use dried for dishes where beans are the star (fagioli, hummus, bean salads). Use canned for soups, stews, and casseroles where beans share the spotlight. Soak older beans overnight; fresh beans from quality sources don’t need soaking. Read time: 15 min | Experience level: Beginner to intermediate
Jump to: Recipe | When to Use Dried | Nutrition | Heirloom Beans | Soaking | Seasoning | Cooking Methods | FAQ
I use beans in everything from Italian fagioli to Mexican charro beans to slow carb stews. Dried beans give you more control over texture, and they can have more nuanced flavor, but they’re not always worth the extra time.
This guide covers when dried beans make a difference, when canned works fine, tips for soaking and cooking, and heirloom varieties worth seeking out. The fagioli al fiasco recipe at the end is a perfect example of where dried beans shine.
This post may contain affiliate links. As an Amazon Associate, I also earn from qualifying purchases. You can read our disclosure information here–
When Should You Use Dried Beans?
In general, if cooked correctly dried beans have superior taste and texture. The flavor tends to be fresher and the texture tends to be tender but not mushy. A common complaint with canned beans is that they are “mushy”
However, dried beans that are not cooked long enough can be too crunchy and if cooked too long they can also turn mushy. The bottom line on this is you have more control over the texture when you cook dried beans.
Many of the dried beans on the market can also be substituted for one another in various recipes. The most important thing, when substituting, is to find a bean of approximately the same size as the bean you are substituting for.
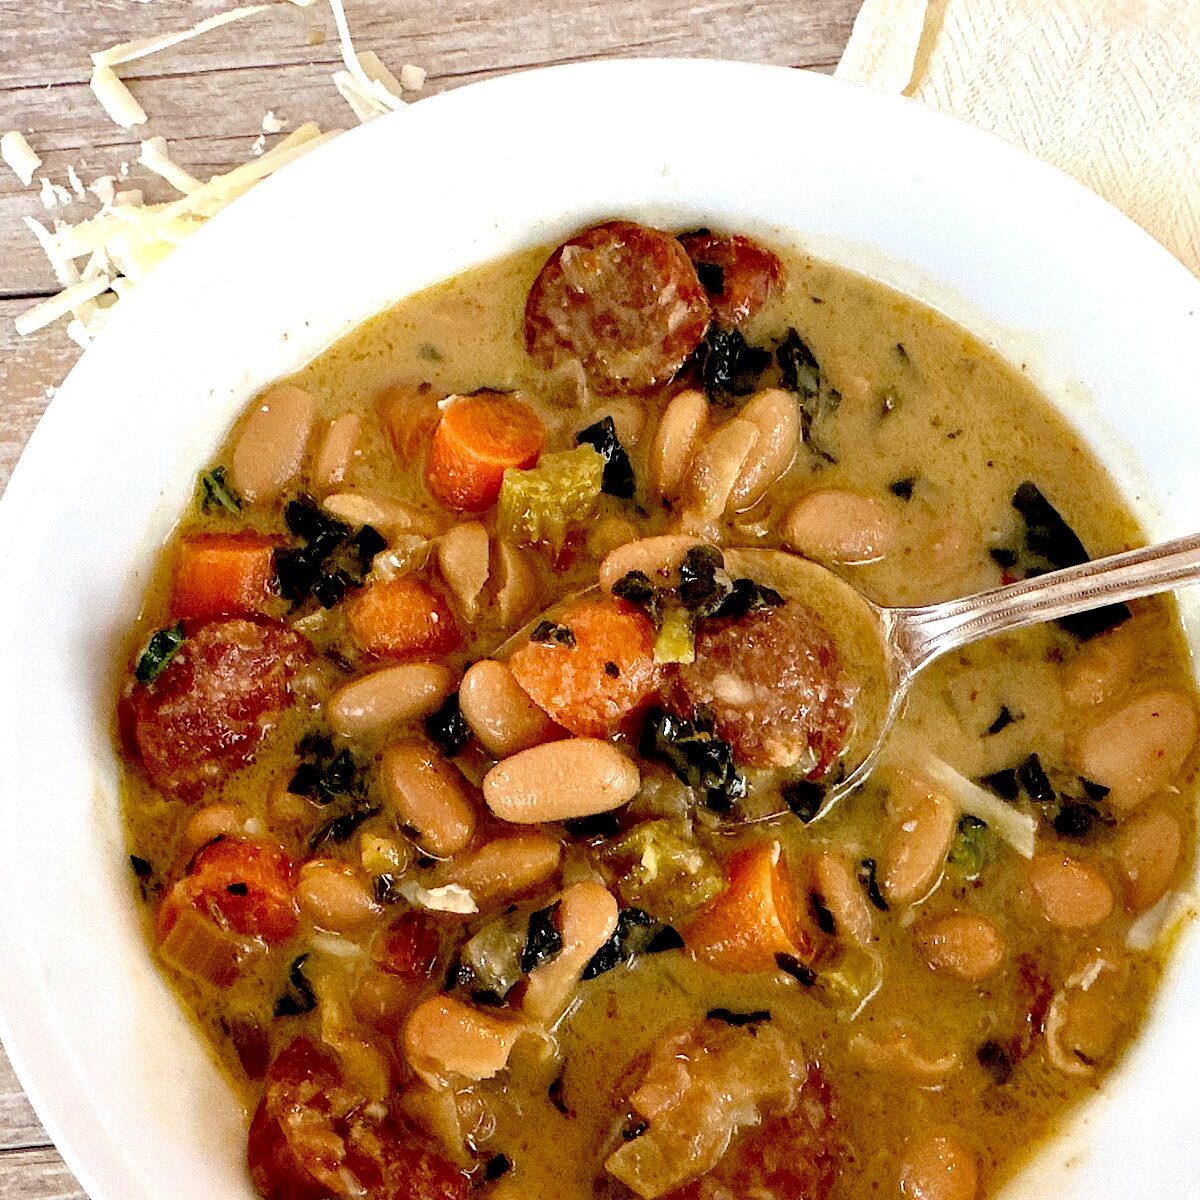
For example, cannellini beans are about the same size as pinto beans and could be used as substitutes in recipes, like in this bean and sausage stew:
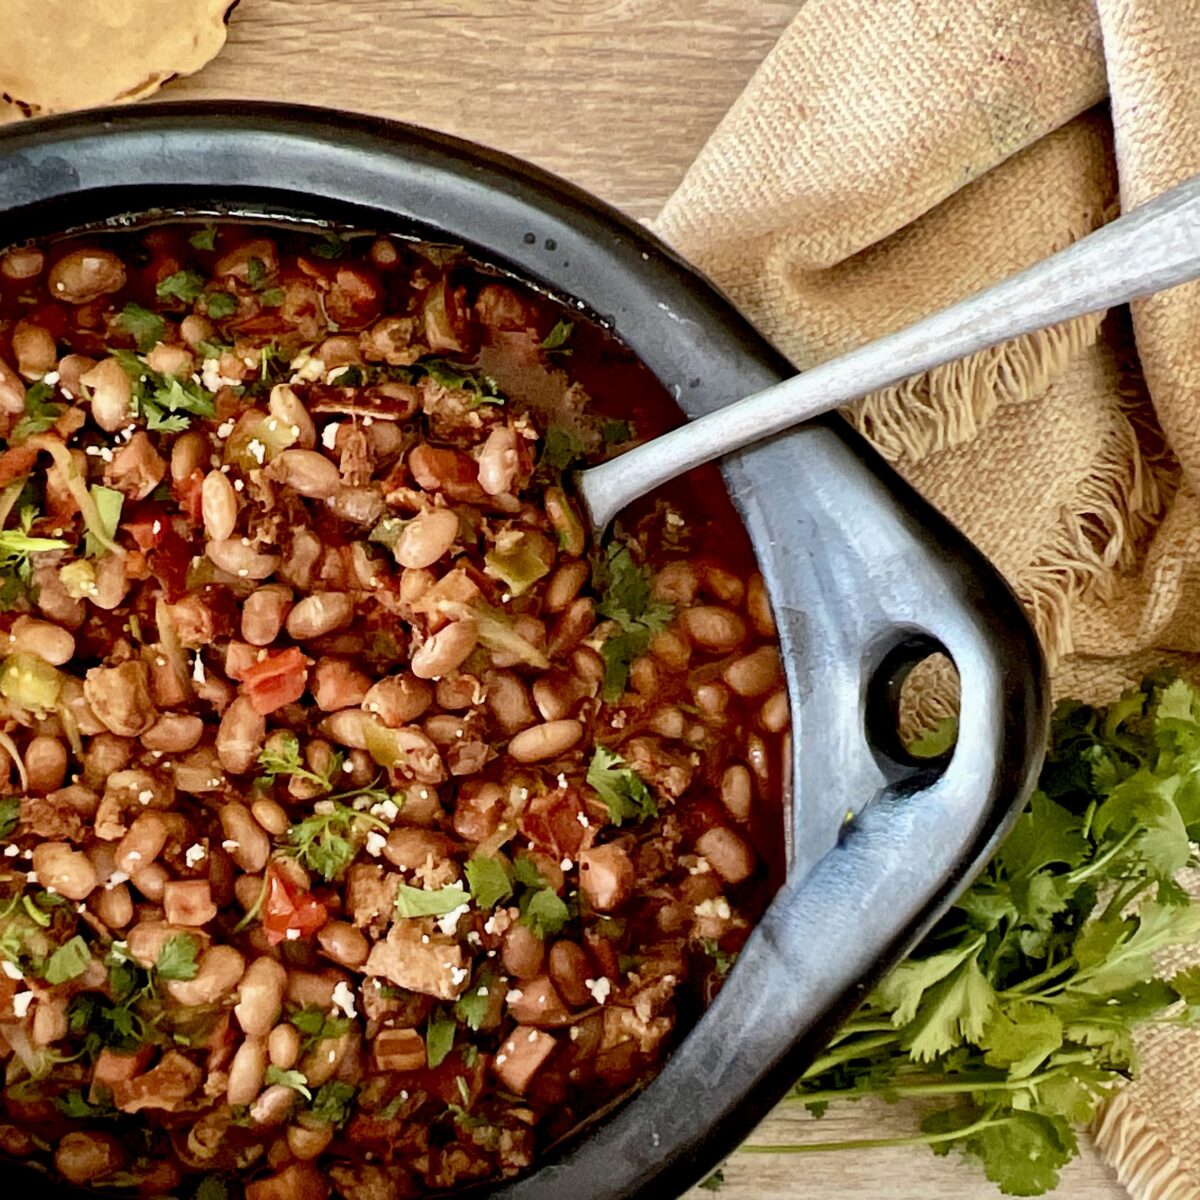
Since cannellini beans and pinto beans are approximately the same size, they could work in recipes as substitutions if you prefer one over the other. For example a good Mexican recipe for slow cooker charro beans (aka cowboy beans) is made with dried pinto beans, but could easily work with cannellini beans.
I use pinto beans often in Mexican recipes, and cannellini beans in Italian recipes, but it is more a function of tradition rather than necessity.
The main downside of using dried beans over canned in recipes is that it takes more time, especially if you prefer soaking your dried beans. It may also require specialized equipment if you want to cook them in a pressure cooker or an enameled large pot (dutch oven).
While using dried beans gives the cook more control over texture, it may take a few experiments in cooking time to get to the texture that is perfect for you (not too crunchy and not too mushy).
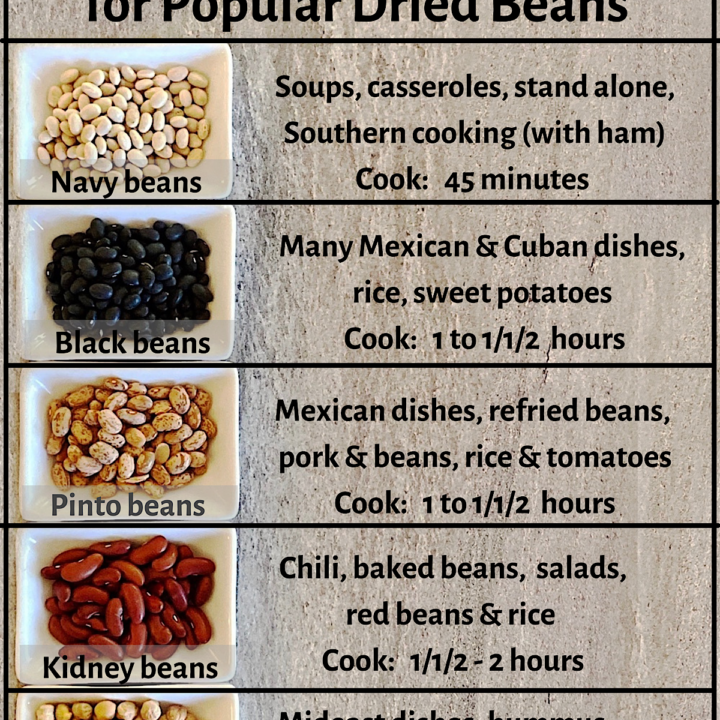
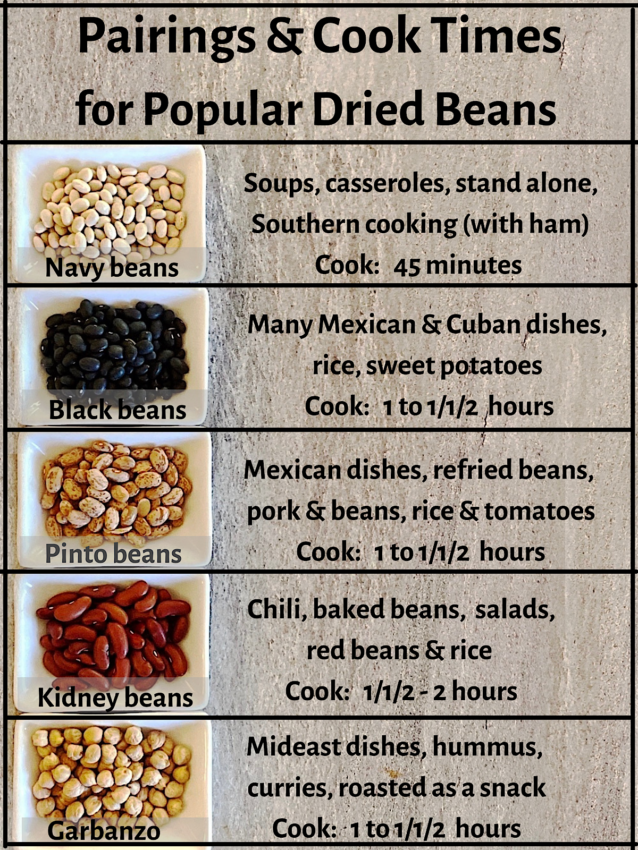
Here are the common uses and cook times for 5 of the most popular type of dried bean:
What Are the Nutritional Advantages of Beans?
Beans are a complex carb, but because they are so high in protein (20% by weight) they are a big plus for those on a plant-based diet. They are also a key protein source that is compliant with a slow carb diet.
Last, but not least, beans are the one and only food that the diet of the 5 Blue Zones regions (areas of the world with the most centurions) had in common. Read more about Blue Zones here.
Dan Buettner (the main man behind the Blue Zones studies) says: “…beans reign supreme in Blue Zones. They’re the cornerstone of every longevity diet in the world.” In general, Buettner says people in Blue Zones eat four times the amount of beans as people in the U.S. Beans are a staple in every single one of the 5 Blue Zones.
**Note: One of the bigger nutritional difference between dried beans and canned beans is that canned beans have more sodium. Draining and rinsing will remove 41% of the sodium (and make you less gassy), but there will still be more sodium than in dried beans.
What Are Heirloom Bean Varieties?
Maybe you, like me, had never thought of beans having heirloom varieties. Heirloom beans bring a unique flavor and look that you don’t see in traditional “commodity” beans. Here are some of the heirloom bean varieties I found intriguing:
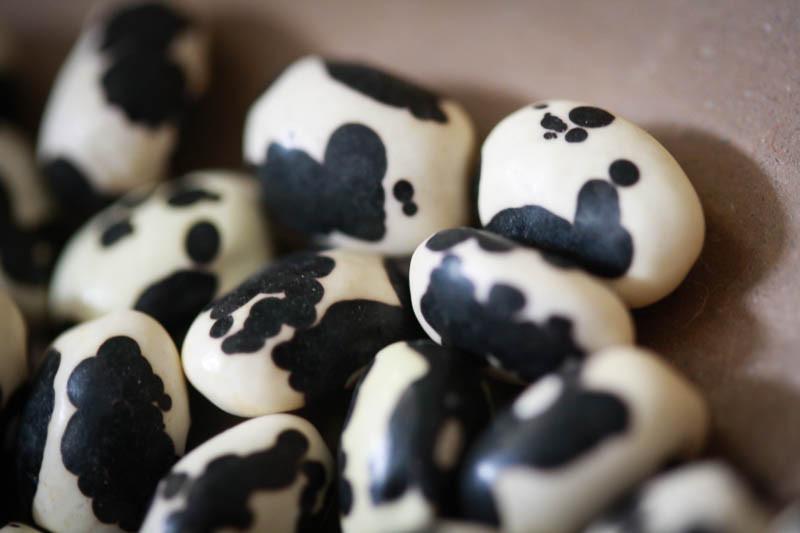
Vaquero Beans
Vaquero means “cowboy” in Spanish, and with the black and white spots, it’s no wonder where this bean gets its name! They are also sometimes called orca beans, but other beans can also go by the “orca” label.
Similiar to the kidney bean, the vaquero is a good bean for stews, chili, soups, and casseroles. The vaquero is a good heirloom bean for long, slow cooking. They keep their shape with the long cooking times.

Mayocoba Beans
The Mayocoba bean is originally from Peru, but has made its way north over the years. It’s also called the Canario bean or the Peruano bean.
The Mayocoba is a mild bean that does well with high flavor ingredients. Instead of using great Northern beans or cannellini beans, try using the Mayocoba!
Since this is a Peruvian bean, why not try an authentic Peruvian bean recipe with specific Peruvian spices and flavors?
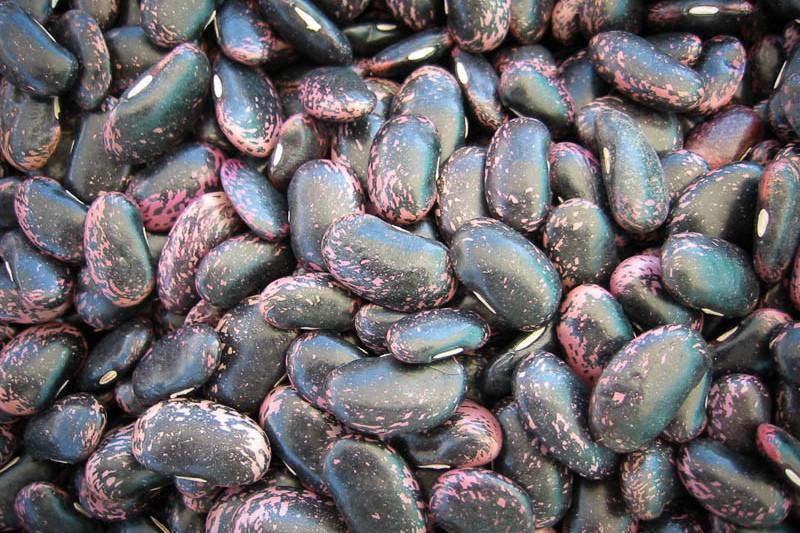
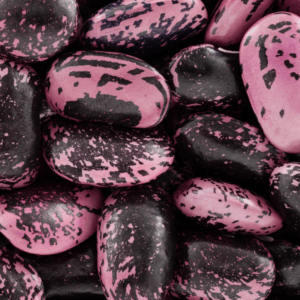
Scarlet Runner Beans
These beans really bring the aesthetic factor! The beautiful pink flowers are edible as well, so some people grow scarlet runners simply for the flowers.
This is a very large, plump, purple-black bean with distinctive markings. Its unusually crisp texture, even when cooked, makes it very suitable for salads. there are no substitutes for that texture.
Originally from Oaxaca, many Mexican dishes are amped up with these beans. They are also really wonderful on salads- especially with some scarlet runner flowers mixed in. These beans also go well sautéed with mushrooms or asparagus.
Find out more about the huge world of heirloom beans on the Rancho Gordo website.
Dried Bean to Canned Bean Conversion
So, dried beans are healthier and taste better, but many recipes call for canned beans. How much dried beans do you need if recipe calls for canned?
In general, one part dry beans equals 3 parts cooked beans. However, with canned beans, the liquid is also included in the “weight”. For a 15 oz can of beans, it is recommended to use a heaping 1/2 cup of dried beans.
How Do You Soak Dried Beans?
There is a fairly heated debate on whether dried beans should be soaked or not for the best texture and flavor. Rancho Gordo (the premier heirloom bean company) maintains that soaking is not necessary. The caveat here is that beans from Rancho Gordo are most likely fresher than dried beans from a grocery store.
My take on the debate is that if you are confident your beans are fresh, you don’t need to soak. If you think they might be old, they will benefit from overnight soaking, primarily from a texture standpoint. They will be more likely to all cook at the same time that way.
Here are a few tips on how to cook beans so that you get the perfect flavor and texture everytime!
There is an active debate on soaking vs not soaking dried beans. This post does a deeper dive into the debate. I am in the non-soaking camp, but if you are a soaker advocate, here is the best way to go about it:
Rinse your beans first in a colander to get rid of any dust, dirt or bugs.
After a quick rinse, it’s time for your beans to soak. Cover them with lukewarm water until they are submerged.
How long you soak your beans will depend on what type of bean you are using and the “soaking method” you are going to use. Here’s a chart to help you determine soak times:
| Soak Time | Bean Type | Method |
|---|---|---|
| 1 hour | Cannellini, great northern, black beans, | Add 1 pound of beans to 6 cups of boiling water and boil for 2-3 minutes. Remove from heat, cover, and let sit for 1 hour. Cook in water from soaking, or drain and rinse. |
| 3 hour | Black beans (or turtle), adzuki beans, mung beans, navy | Add 1 pound of beans to 10 cups of boiling water. Return to a boil and remove from heat. Cover and set aside for 2-3 hours. Cook in water from soaking, or drain and rinse. |
| Overnight | Garbanzo/ chickpeas, kidney, butter (lima), pinto, soybeans | Cover 1 pound of beans with 10 cups of water. Let soak overnight or for at least 8 hours. Drain and rinse beans before cooking. |
The older, drier and larger the bean, the longer it needs to be soaked. For lentils and split peas, you don’t have to soak at all.
If you are opting for the overnight method, beware that you can actually soak your beans too long. If you soak for more than 10 hours, the beans can become mushy and lose some flavor once cooked.
Short Soaking the Beans:
If you are in a hurry, there is a shorter way to soak your beans. First rinse the beans and then cover them entirely with hot water in a large pot. Boil the beans for 2 minutes, then cover with a lid, remove the pot from the heat, and let them soak for an hour.
How to Season the Beans?
When I first started using dried beans, I was a bit cautious, as I had heard that they can give you gas if you don’t cook them right, and they can turn out too mushy or too crunchy. Now that I have some experience with dry beans under my belt, I feel much more capable and my beans never come out too mushy or crunchy!
There is also a debate around whether to salt the dried beans during the soaking. Some say this helps reduce cooking times, while others say it isn’t significant enough to notice.
If you do add a tablespoon of salt to your beans while they are soaking, you will definitely want to drain and rinse the beans. Salt added to the beans while they are cooking can lead to toughness of the bean, making them too crunchy.
Also, make sure to taste the beans prior to adding more salt once they are finished cooking.
Tip: Wait Until the End to Add Acid and Salt
While most additives are fine to add while the beans are cooking, somethings should be added only when the beans are tender and finished cooking. Acid and salt added early on will make the beans tough and crunchy, so wait until the end to add things like tomatoes, lemon/lime juice or wine….and salt
How Do You Cook Dried Beans?
There are several different methods that work well for cooking dry beans. My favorite methods involve the instant pot pressure cooker or the dutch oven over the stovetop.
Instant Pot Dry Beans
Instant pots or pressure cookers are great for cutting down the cooking time for dry beans! Once you have soaked your beans, add them to the pressure cooker and fill with water about 3 inches above the beans. Pressure cook for 15 minutes, followed by a quick release.
*Note: We used a Instant Pot brand pressure cooker, so some of the terminology may be different depending on your model of pressure cooker.
Stove Top Dry Beans (Dutch Oven)
Once you have soaked and rinsed your beans, add them to a stock pot or dutch oven and cover with about 2 inches of unsalted cold water. Do not salt the beans until you’re finished cooking or they will become tough).
Bring to a very gentle low boil, reduce heat, and cover partially. Cook until beans are soft (see chart above for different cook times). With this method, you want to make sure your beans never come to a “rolling” boil, as this can break the skins.
The beans should be covered by water at all times; you will probably have to add more water to the beans to keep them completely immersed.
Oven Baked Casserole
If you’re in more of a hurry to get dinner on the table, try using canned beans in a casserole and baking them. This 30-minute Tuscan Bean Casserole recipe is sure to please, with plenty of robust flavor without the long simmering required.
How Do You Store Dried Beans?
There are no preservatives in dried beans, so the age of the beans is important. Older beans are drier, and therefore require more soaking ad cooking time and their flavor may be a little more dull. Generally it’s best to use dried beans that are no more than a year beyond their harvest.
Keep them as cool as possible, but not in the refrigerator. Be careful not to mix batches of old beans and young beans, because their cooking times will be different.
Recipes Using Dried (or Canned) Beans
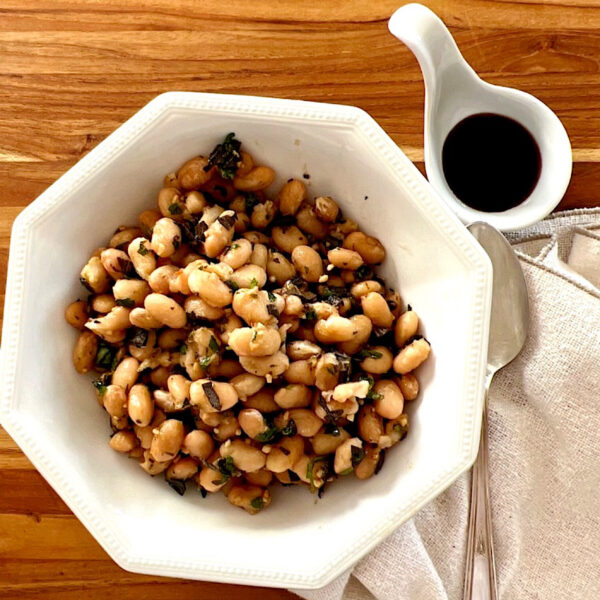
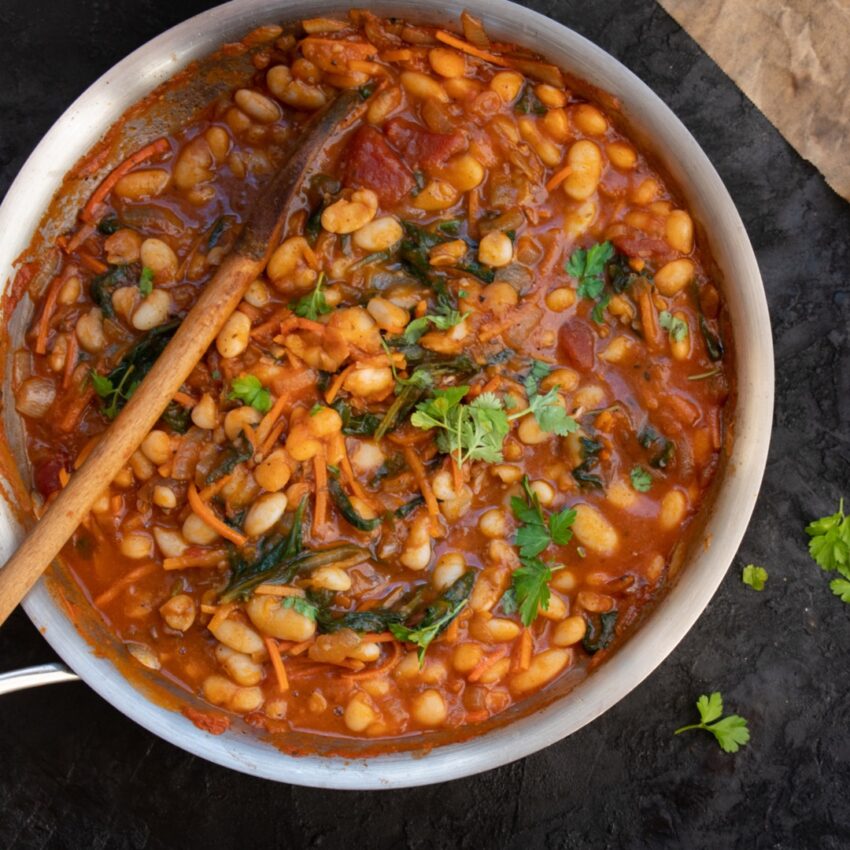
The recipe below is a Tuscan (Italian) bean side dish called fagilio al fiasco. I used cannellini beans as they were easy to find in the local grocery store.
If you are more of a bean connoisseur try cranberry beans (available from Rancho Gordo). They are velvety and thin-skinned they are an absolute dream to cook with.
Here are some additional recipes we love, and we think you will too!
- Homemade hummus with harissa
- Tuscan Casserole with Cabbage, Sausage & Cannellini Beans
- Slow Carb Pork Posole with Smoky Anchos
- Seared Tuna with White Beans
- Pork Pozole with Garbanzo Beans
- Slow Carb Crockpot Chili
- Refried Black Beans to accompany Chilaquiles
FAQ
One heaping 1/2 cup of dried beans equals one 15 oz can. Dried beans triple in volume when cooked.
Not always. Fresh beans from quality sources (Rancho Gordo) cook fine without soaking. Older beans from grocery stores benefit from overnight soaking for even cooking.
Old beans, hard water, or adding salt too early. Use beans less than a year old, add salt only after beans are tender, and consider soaking overnight.
Slightly. Canned beans have more sodium (rinsing removes 41%). Otherwise, nutritional content is similar. Both are excellent protein sources.
Vaquero, garbanzo, pinto, black, and navy beans hold their shape during long cooking. Avoid lentils and split peas for stews where you want intact beans.
Best within one year of harvest. Older beans take longer to cook and may have duller flavor. Store in cool, dry place; don’t mix old and new batches.
Interested in the Slow Carb Diet? Check out this comprehensive E-Guide on Fat Loss through a Slow Carb Diet.
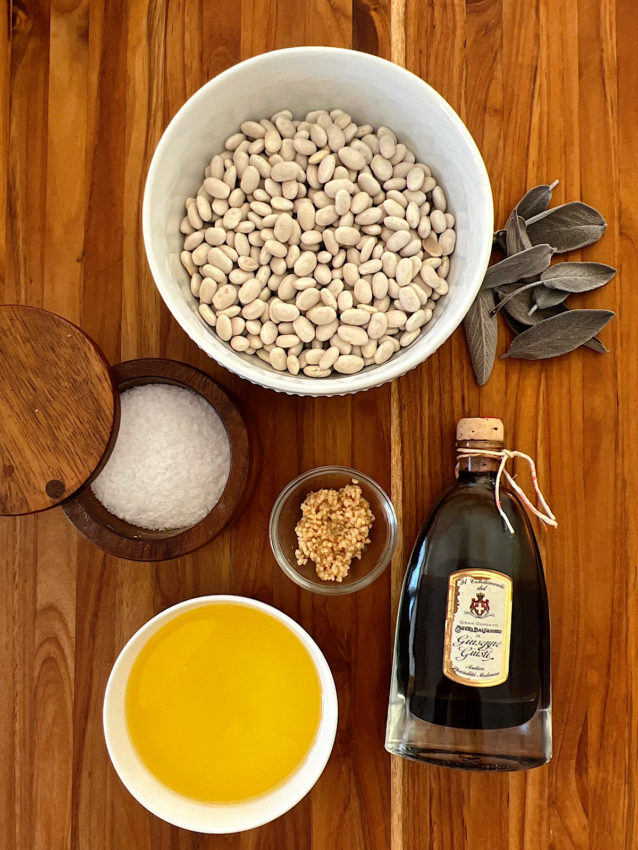
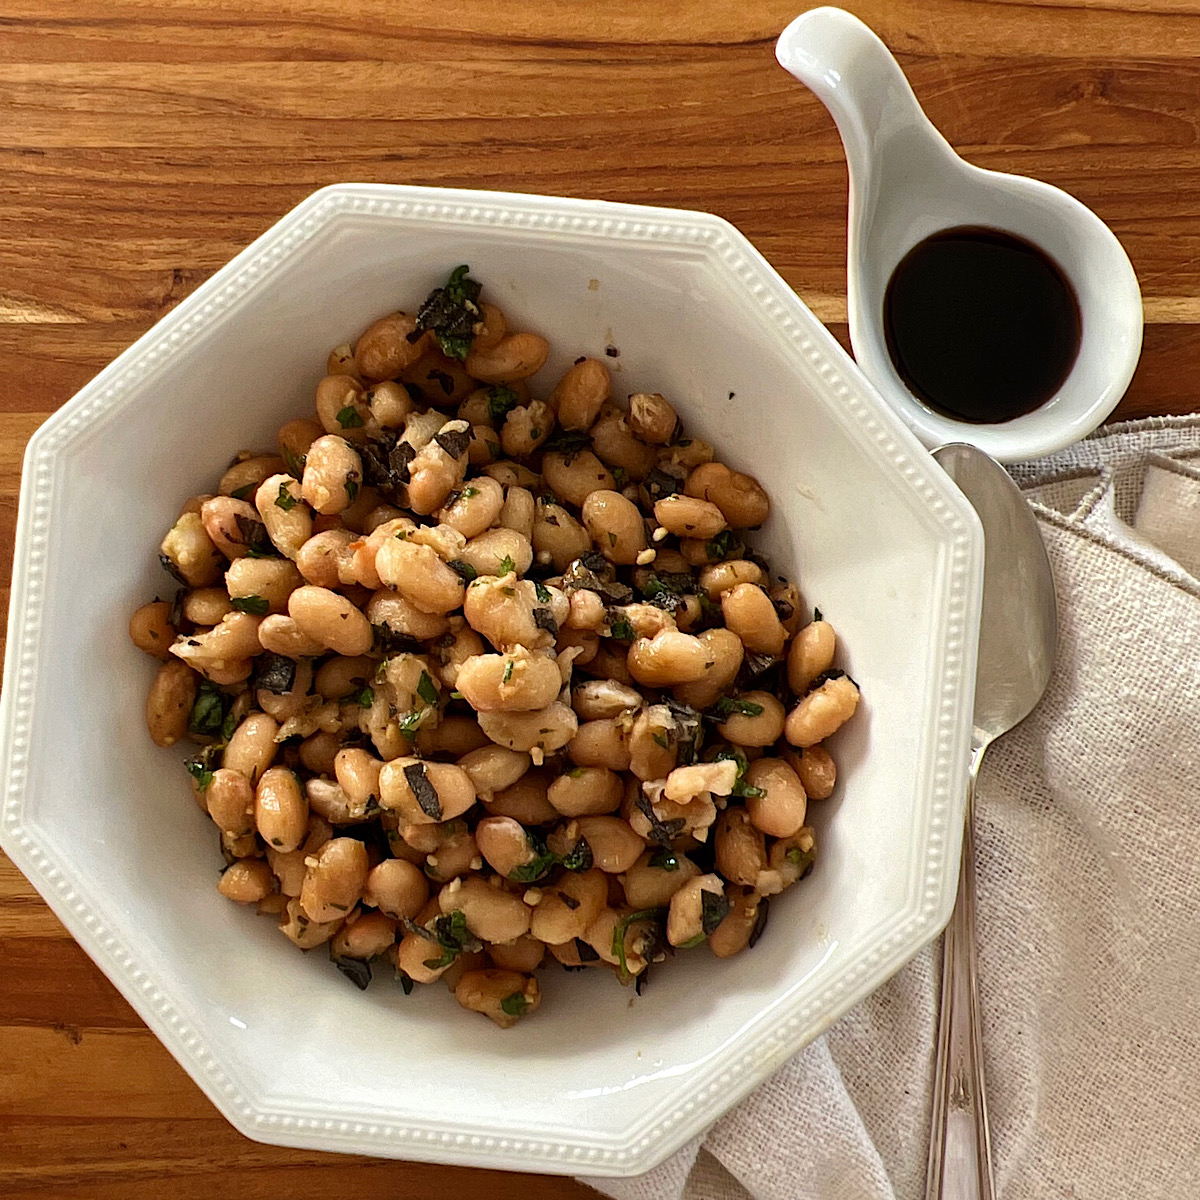
Fagioli al Fiasco
Equipment
- Instant pot Or dutch oven
- Dutch oven Or pressure cooker
Ingredients
- 9 Ounces cannellini beans cranberry (borlotti) beans are also great
- ¼ Cup minced fresh sage could substitute rosemary if preferred
- 1 Teaspoon minced garlic
- 3 Tablespoons minced fresh parsley
- ½ Cup olive oil
- 1 Tablespoon balsamic vinegar
- 1 ½ Teaspoon sea salt
Instructions
- If you are soaking your beans, soak them for at least 1 hour (or quick soak as noted in the notes section). When they are done soaking, rinse them and place in instant pot or dutch oven and cover with 2 inches of water.If you are not soaking your beans, rinse them and pick out any bad ones and then place in instant pot or dutch oven and cover with 2 inches water.9 Ounces cannellini beans
- In instant pot/pressure cooker, secure the lid and turn dial to “sealing”. If your pot has a “bean” button, press that. If not, use the soup button and turn the dial manually to 40 minutes.If you are using a Dutch oven instead, bring the beans to a gentle boil, reduce heat, and cover partially. Cook for 60-90 minutes or until soft, adding water if needed (beans should be covered by water at all times)
- When beans are done, drain them and place in large bowl. Add the rest of the ingredients (sage through salt), gently stir together and let it sit for 1/2 hour.1/4 Cup minced fresh sage, 1 Teaspoon minced garlic, 3 Tablespoons minced fresh parsley, 1/2 Cup olive oil, 1 Tablespoon balsamic vinegar, 1 1/2 Teaspoon sea salt
- Serve warm or at room temperature
Video
Notes
Nutrition
Interested in the Slow Carb Diet? Check out this comprehensive E-Guide on Fat Loss through a Slow Carb Diet.
Leave a comment