Quick Summary: A complete guide to starting tomatoes and peppers from seed indoors. Covers equipment setup, potting soil options, step-by-step germination, grow light configuration, potting up seedlings, and hardening off before transplant. Expect 6 weeks from seed to transplant-ready tomatoes, 8 weeks for peppers.
Jump to: Essential Equipment | Potting Soils | Germination | Potting up | Hardening off | Disease | Transplanting | FAQ
This post may contain affiliate links, and you can read our disclosure information here–
Methods for Successful Germination and Growth
In this post, I’ll pass on some of what I have learned over the years, in hopes that it will help you on your way to growing healthy plants in your garden or farm.
Caveat: I grow mostly heirloom tomato and pepper seeds, but the principles and methods of seed-starting relate to most seed varieties. The variations are mainly in the time it takes different seed types to germinate.
Of course, you will have to modify the size of your set-up if you are only starting a few seeds for a small garden or if you are starting seeds to grow tomatoes in containers.
What Equipment Do You Need to Start Seeds Indoors?
OK, let’s get started! Gather together the following items to get you on your way:
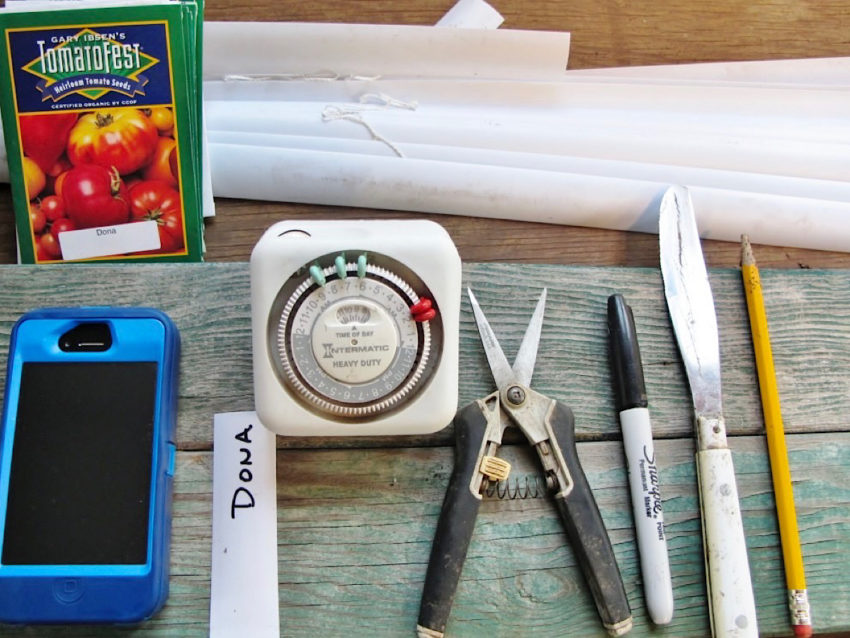
- seed packages,
- something to use for tags (I use cut-up window blinds),
- pencil (to poke seeds into the soil,
- table knife (to extract seedlings from plugs),
- marker (for labeling variety & date),
- small clippers (to thin seedlings to one per plug),
- timer for grow lights,
- plastic (to cover trays for germination)
- watering can (need small spout to water small plants gently)
- seed plug trays with undertrays to hold water drainage
- potting mix (see below for recommendations)
What’s the Best Potting Mix for Starting Seeds?
If you are a 100% organic grower, you can make your own potting mix (but it is a bit involved). I have tried several recipes, but here is my favorite combination for organic DIY potting mix (you will need to scale down proportionally for smaller batches):
DIY Organic Potting Soil
- 5 gallons compost
- 5 gallons peat
- 3 – 5 gallons mix of vermiculite & perlite
- 1/2 cup lime (don’t use this if your compost is horse manure as the beds are often limed)
- 1/2 cup bonemeal
- 1/2 cup bloodmeal
- 1/2 cup greensand (or 1/4 cup sul-po-mag)
Store-Bought Potting Mix
If you’re not worried about being 100% organic, Miracle-Gro Moisture Control is a potting soil that gives consistently good results.
Tip: The main thing to know is to use a sterile potting mix, not garden soil.
Soil that comes straight from your garden often carries disease-promoting fungi that is hard on young seedlings, not to mention the weed seeds prevalent in garden soil.
What Containers Work Best for Seed Starting?
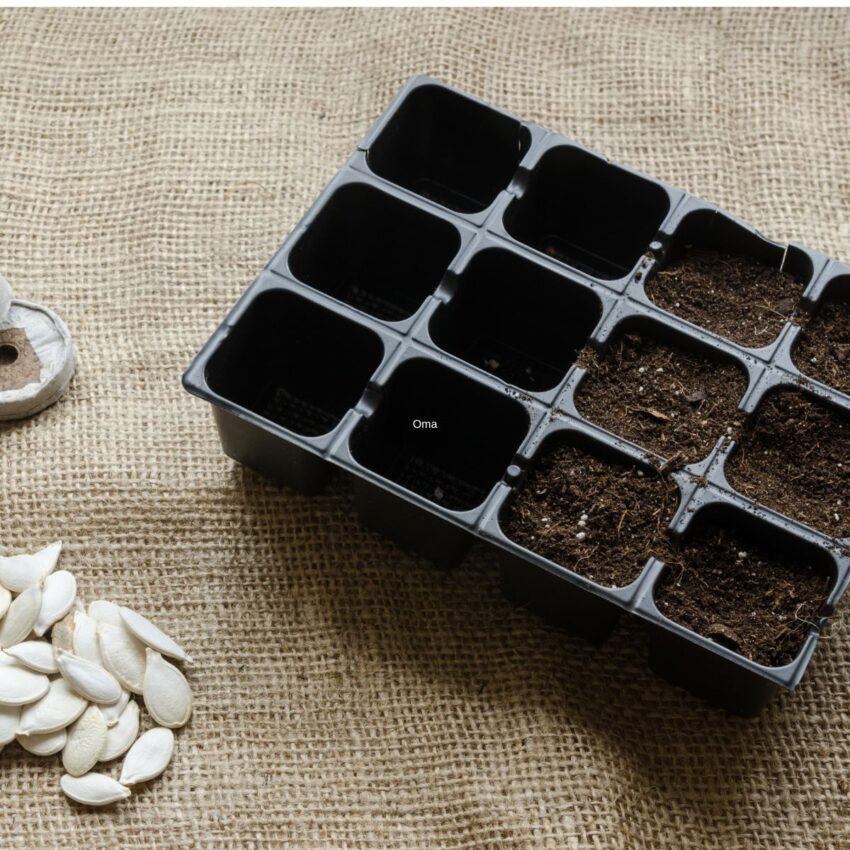
I use sturdy, reusable, 128-cell flats that have lasted a minimum of 5 years (and I am not gentle with my equipment).
Any container will work, including yogurt cups, peat pots, etc. as long as there are holes in the bottom for drainage.
Larger seeds (like squash seeds) would need flats with larger cells (I use 98-cell flats for large seeds)
One of the reasons I start my seeds in flats with shallow cells is to fit as many seedlings as possible under the grow lights, but an equally important reason for me is that the seeds will germinate faster in smaller shallow cells.
The small amount of potting mix in each cell heats up more quickly, and there is not as much of a danger of over-watering.
Tip: It is worse for the container to be over-watered rather than under-watered. Overwatering causes the condition of damping off which is fatal to seedlings.
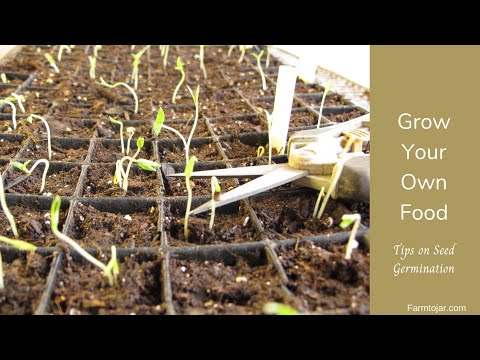
How to Germinate Tomato and Pepper Seeds Step by Step
These are the 5 key steps in getting your seeds to germinate:
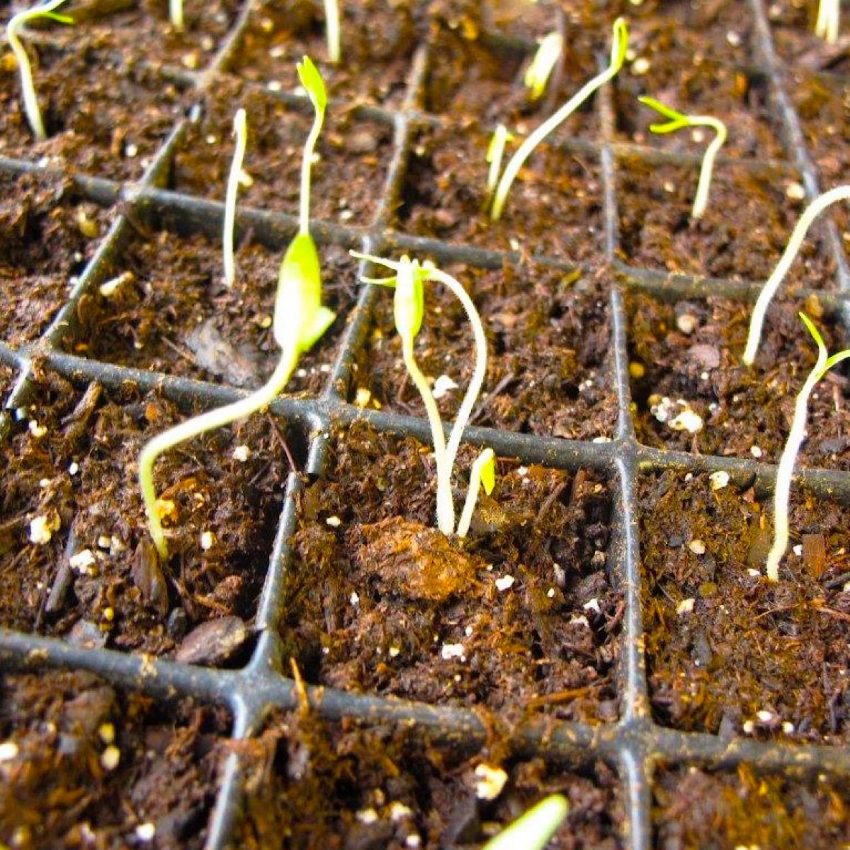
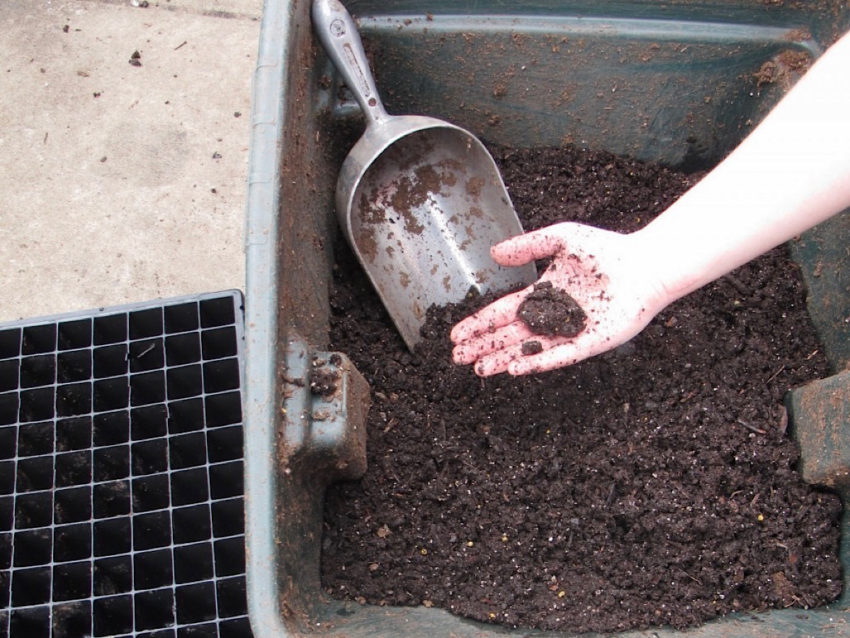
- Pour your potting mix into a large, shallow tub. Add hot water in increments and mix well with your hands. Take a handful of the mix and squeeze. You want the potting mix to be damp enough to form a ball, but not so wet that you can wring water out of it with a gentle squeeze.
- Fill the flat with the potting mix and then hold it slightly above the floor and let it drop to the ground to make sure the mix compacts a bit and gets into all the cells. If the mix is too fluffy, the seed will not make good contact with the soil particles. Refill any of the cells that are not full after dropping the flat.
- Mark the seed variety and the date on a small but sturdy tag (I use cut-up Venetian blinds I get at garage sales), and place the seeds on top of each cell individually. Some people pour the seeds out carefully onto the cells, but it doesn’t take that long to seed the cells individually (good time to listen to music or podcasts).
- Now go back to the first cell and use the pencil with one hand to poke the seed slightly down into the mix and use your other hand to firmly cover the seed with a small bit of the soil. If you are only starting a few seeds, and using individual containers, don’t poke the seed down too far into the soil. It just needs to be slightly covered. The general rule of thumb on sowing is the depth should be 3 times the size of the seed. The main thing is to make sure the seed has been firmly pressed into the soil. Good contact with the soil is important for germination.
- Cover loosely with plastic to keep moisture in and the seeds warm. The clear tops that come with some of the flats are fine, but you don’t need them. The plastic is only on the seeds for a few days and then you are done with it. Easier to fold up a piece of plastic and store it for next year than to store the hard plastic covers.
Warm soil matters more than warm air as to the speed of germination. I use hot water when mixing potting soil and place 100-watt bulbs under my trays to keep soil temperature around 80°F for tomatoes, 85°F for peppers.
I tend to keep the peppers on the dry side and the tomatoes a bit more moist. When I do water them, it’s a very minimal gentle watering. I use a small watering spray wand attached to a hose which is attached to my shop sink.
Remember that germination time also depends on the seed variety and how old the seeds are.
Tip: The date on the seed package is a packaging date, not the date the seed viability was tested. Buy seeds from a credible company and don’t keep them over for too many years if you want 100 percent germination.
For detailed guidance on soil temperature, seed viability, and troubleshooting seeds that won’t sprout, see my Tomato and Pepper Seed Germination Guide.
How to Adjust Variables for Seedling Stage
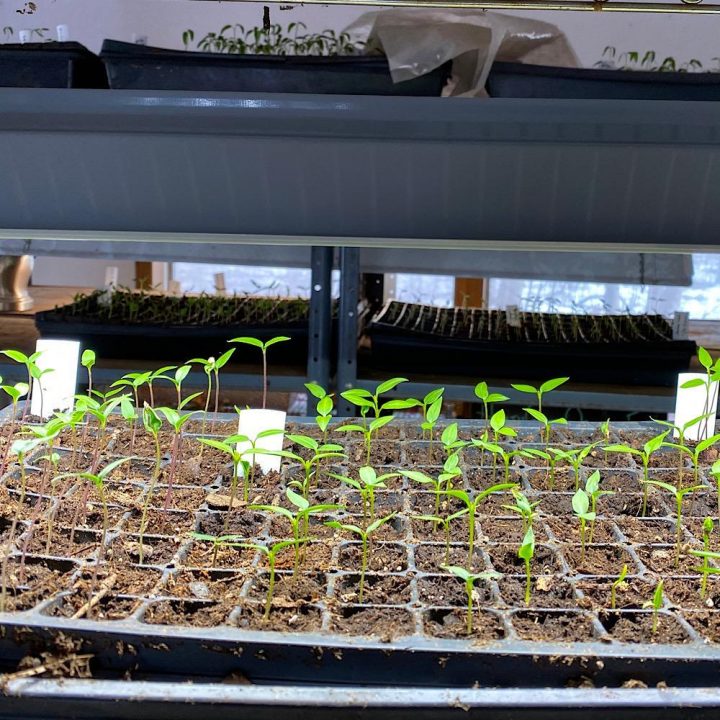
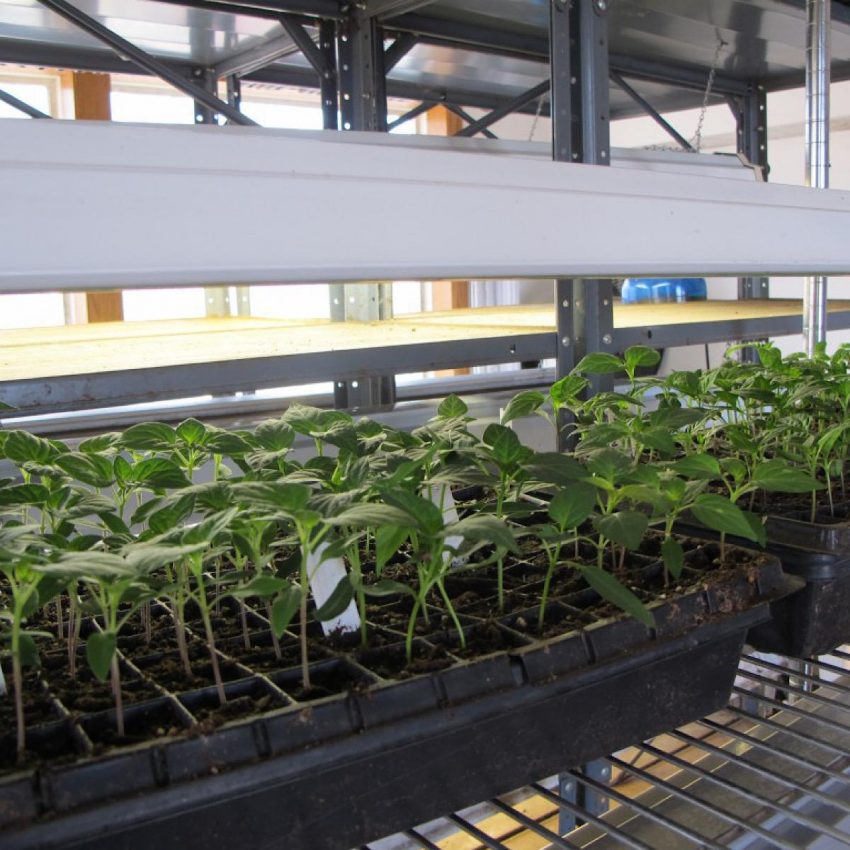
My husband set up a grow light system for me that involves five 4-tiered metal shelving units with 20 fluorescent light fixtures attached to each shelf (see example below).

Whether you have one light fixture or twenty, there are several key components to remember:
- The distance between the light and the seedlings will change as they grow, so make sure the light can be easily adjusted up and down. When the plants are very young, they will need to be fairly close to the light (about a 1-2 inch distance). This is to ensure they do not get leggy and develop weak stems trying to reach for the light. As they get bigger you can increase the distance so that the light source covers more area (around 4-6 inches distance).
- Use two different types of fluorescent bulbs in the fixture; one warm bulb and one cool bulb. You do not need to buy expensive gro-light bulbs, the combination of warm and cool bulbs is very effective.
- Keep the lights on the plants for 14-16 hours per day, but turn them off and let them rest at night. A timer that you can plug the lights into is a must if you want to sleep peacefully.
Day and Night Temperatures for Indoor Seedlings
Once germinated, I tend to grow my seedlings fairly cool to encourage slow steady growth that will give you sturdy, stocky plants.
I keep the daytime temperature around 65 degrees and the night temperature around 55 degrees. At this stage, it is important not to have wide fluctuations in temperature.
Watering “After” Germination
After the seeds have germinated but the plants are still very small, keep the soil moist, but not wet. Seedlings will need more water at this stage than when germinating, but it is still important to have a light hand with watering. The plants are still very tender.
Note: If you are using a grow light setup similar to mine, make sure that the bottom tray that the plug tray sits in does not have holes in it or it will drain onto the grow lights below and short them out.
Thinning the Seedlings
Even if you have carefully hand-seeded, it is not uncommon to get 2-3 seeds germinate in one cell. Make sure and snip off all but one (the straightest, strongest one) right at the soil line, so that they won’t compete for the same soil and water.
It’s difficult to snip a seedling sometimes, but it is worth it. Do it.

Thinning seedlings will prevent legginess, a common problem in young tomatoes.
Air Flow
Some of the literature recommends running your hands across tomato seedlings periodically, tickling them, to make the plants stronger. A fan works much better. An overhead fan is ideal, but a floor fan or a small table fan will also work fine.
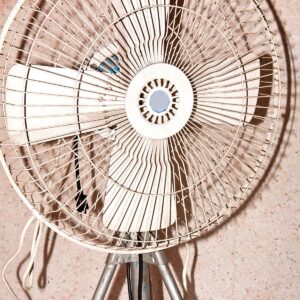
Keep it blowing across the seedlings for most of the day and turn it off at night. It does wonders for the strength of the plants. They must think they are outside in the gentle breeze of spring. Just don’t let them experience the roiling thunderstorms of spring at this stage of their growth!
When Should You Pot Up Tomato Seedlings?
This is very important, and a big reason why your home-seeded plants will be healthier than the plants you often see for sale at various stores, especially later in the season.
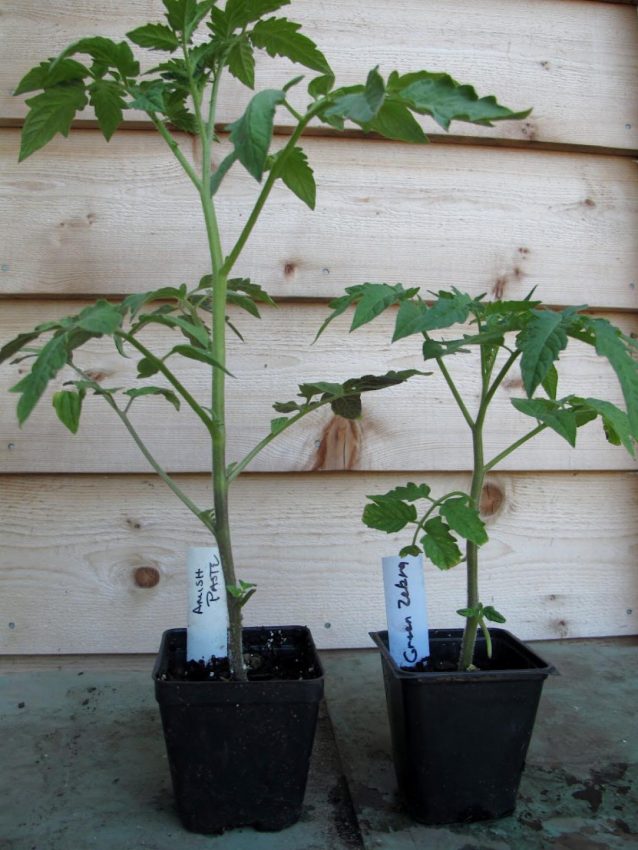
Often the plants available in the home stores have long since outgrown their small containers, especially if you are buying late in the spring.
Take Note! When the seedlings are 3-4 inches tall and have their second pair of leaves, it is time to gently take them out of their cell and move to a larger pot.
I use a dull kitchen knife to slide down the side of a cell and pop the plug out without disturbing the roots. I pot them up into a 4-inch pot filled with more of the same potting mix that you used for germination.
If your seedlings have become leggy, plant them a little deeper in the pot, but do not cover the green seed leaves, as they are needed to provide energy.
Water the plugs well “before” you re-pot so the soil will stick to the roots and protect them from drying out.
Keep the re-potted plants out of bright sunlight for a few days so they can ease into the transition.
How to Harden Off Tomato and Pepper Plants
Before planting in the ground be sure to harden off your young seedlings in small steps. This stage is important to prevent them from wilting in the outdoor elements after being babied indoors.
How Long after Germination before Seedlings can Go Outside?
It takes about 6 weeks for a tomato seedling to reach optimum growth for planting outside (about 8 weeks for peppers).
Tip: Wherever you live, determine when your weather is likely to be stable enough to plant in the ground and count 6 weeks back from that date before starting your seeds.
In Central Minnesota, where I live (Zone 4-5), I start all of my tomatoes March 14th through March 16th, and I start the peppers about 2 weeks before that.
In mid-May, after they have been hardened off thoroughly, they are primed to get in the ground and start doing what they are destined to do….grow.
Take Note! Your seedlings must be at the optimum stage of growth when you plant them outside. This means stocky plants, with thick stems, about 5-9 inches tall, with good root growth (preferably having been potted up to 4-inch pots so they are not root-bound).
You do not want tall thin plants with weak stems, because they will not transplant well.
Nor do you want huge plants in small pots that already have blossoms on them, because this means they have already spent a lot of energy forming those blossoms, leaving them somewhat depleted and hence not able to yield as many tomatoes.
Here is a video on hardening off if you prefer video over text.
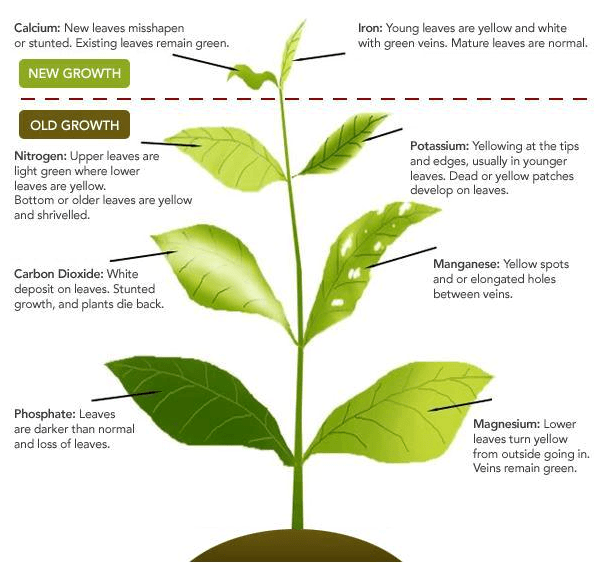
How to Diagnose Disease in Young Seedlings
It is important to troubleshoot problems and disease signs while the seedlings are in this stage and vulnerable. Typical diseases for seedlings are different than the diseases you will see later on. They are easier to remedy at this stage.
FAQ
Seed trays with drainage, sterile potting mix, a heat source (100-watt bulbs or heat mat), grow lights with a timer, plastic covering for germination, and a small fan for air circulation.
About 6 weeks for tomatoes, 8 weeks for peppers. Count backward from your last frost date to determine when to start.
Use sterile potting mix, not garden soil. Garden soil carries fungi that cause damping off. Miracle-Gro Moisture Control works well, or you can make your own organic mix.
Keep lights 1-2 inches above very young seedlings to prevent leggy growth. Increase to 4-6 inches as they mature.
When seedlings are 3-4 inches tall with their second pair of true leaves, move them to 4-inch pots. Water well before transplanting to keep soil attached to roots.
Gradually expose seedlings to outdoor conditions over 7-10 days. Start with a few hours in shade, then increase sun exposure and time outdoors daily.
If you want a workbook and planner on growing your own tomatoes, I have published a downloadable pdf called The Tomato Workbook for Beginners, which consolidates my 20+ years of growing both heirloom and hybrid tomatoes.
If you prefer a print book (paperback), you can also order it from Amazon for $11.95.
you should also note that the plants need to be in an area free of all critters.
Definitely! My first year of starting seeds in the shop I lost several flats of seedlings when the young leaves disappeared, leaving a bunch of small straight stems. It took a while to figure it out, but it turns out mice were nipping off the leaves at night.
[…] the standard charts predict by placing bottom heat under my flats using 100-watt light bulbs (see this post for my seed-starting setup). A nice infographic on the relationship between temperature and […]
Wonderful information. Thank you for sharing what worked for you.
thank you for your knowledge I am new to this all its a new adventure for me im excited but nervous at the same time soil with your experience the soil could I use a name brand? OR your combination would be the best for a beginner u did say moisture control would work iam planning to do 500 plants your recepie is for how many? where would you buy heirloom seeds from what company? lots of questions here ;] thanks a bunch joeeeezz
Joanne, Miracle Grow Moisture Control is a good brand. I have a post on my site regarding where I purchase seeds. Just use the search bar and type in seed catalogs and there is a comprehensive review.
I have read lots of websites and yours is so well detailed. Thanks for all the great information. I have one question that I have found the answer… Once you place the seedlings under the grow light how long should they stay under 1 month, two weeks, etc. Your answer would be appreciated. JP
Jacqueline, Basically they need to stay under the lights until they have their second set of true leaves or until the weather permits them to be hardened off. They are not under the lights for 24 hours. I keep them under lights for about 15 hours a day when very young and back off after they get larger.
Dear Dorothy,
Is there anywebsite that i can order heirloom tomato seeds ? Thank you in advance.
I get most of mine from Totally Tomatoes, with the rest from Tomato Fest
Domates, in the search bar of this blog type in “seed catalogs” and it will show you my top 5 favorite catalogs for ordering heirloom tomato seed and why. You can start with totallytomatoes.com as they probably have the most. A lot of theirs are hybrids also however.
[…] little bit before you stick them outside for good. For a great seed starting tutorial, check out Tomato Headquarters site. Probably the best guide I’ve ever read, so I figure you can read it there instead of […]
Thank you for your excellent article! This is our second year gardening and we tend to jump into things with both feet. I am trying to grow enough to feed our family of 6 (fresh and canned tomatoes) for the year. Where do you find the cool/hot lights? We can only find grow lights online. We bought T5 lights at Home Depot. It came with two 3000k bulbs, 2280 lumens. We looked all over Home Depot. So confused!! HELP! =))
I just get my lights at either Walmart or Menards. They might say something a little different than “warm” and “cool” depending on brand.
Hello, we have heirloom seeds from large German tomatoes and have started seedlings indoors with a grow light as we did last year with great success. This time we are having a problem with entire plants disappearing after they reached 3-4 inches tall. The plants are in flats located near but not touching basil plants and a Philodendron. The other plants were not harmed. We thought maybe mice, but have found no droppings or other indications and there are 4 cats living outdoors around the house. Is there anything else we should be looking for? Maybe a parasite in the starter mix? Thanks for any help you can provide.
Shirley, the only thing I know of that makes larger plants disappear totally is some kind of chimpmunk or animal pest. I don’t know much about parasites. If they are too cold and damp they might get root rot and die, but you would probably see some sign of the plant.
Absolutely love the blog! It was a revelation for me that you’re not using expensive grow lights since I can’t seem to find anyone else who uses them. I know someone else left a comment earlier asking about the lights but no specifics were mentioned. It would be great to know which t lamps you are using since everyone else seem to think that those lamps other than t12 are not efficient for growing. The t12 are definitely on the expensive side since they need ballasts. Do you have one in a box lying around that you could post a picture of or even just let us know the information on it.
Thank you!
I just use the basic variety that you get from Walmart that fit the shop light fixture. I use one cool and one warm in each shop light.
When is the next posting. I think I’m ready for Hardening off.
Update: The post for hardening off seedlings is here: https://farmtojar.com/tips-for-hardening-off-tomato-and-pepper-seedlings/
best for sanwich
I have been cross referencing so many videos, websites, and books, it has become in a muddle…..Your article is the best!…Taking us through the whole process, answering the questions that I have been wondering on…. Thank you!
@Helen Bunch, I agree! Got it bookmarked because I will keep referring back 🙂
Thank you so much Helen! I love getting feedback to know if my posts are helping people or if there is something more I can add. Appreciate you taking the time to comment!
Thanks Dorothy, your info is realistic and feels like good advice rather than a fluffy commercial article. You’ve answered many of the questions I have! I’m using a grow light for my seedlings (just sprouted about 4-5 days ago) and I’m afraid they might grow too tall and skinny, so I was trying to find out how much time they should be under lights. I love your advice about having a fan flowing for air circulation too!
@dorothy stainbrook, Oh I didn’t know that having the lights too far made them leggy, that totally makes sense! I just lowered my lights, I had them 18″ over the seedlings.Thank you!
You bet. Happy planting!
Hi Nancy, the best ratio for the seedlings to be under the lights is for 16 hours under lights and the rest of the time dark. Just make sure the lights are fairly close to the seedlings and that will prevent them from getting tall and skinny. Most tomato plants get leggy because they are reaching for the light so having the light source close to them is what helps.
My father used to sterilise the soil by placing a tray of soil in the oven to cook the soil to kill all fungus etc before putting the seeds in he always got 100% germination
Yes, I suppose that would work, but if you’re starting very many seeds that could get messy and time consuming pretty quickly. If you buy potting soil it has already been sterilized. Same with if you are making your own mixture from purchased vermiculite etc. The only time potting soil wouldn’t be sterile is if you are using soil from your garden for example.
Brilliant…absolutely brilliant. Historically, trial and error has sucked the enthusiasm out of me as the seedling topple over perish. Your in-depth tutorial highlighted the error of my ways and provided appropriate corrections for my 2024 attempt! Thank you. You are indeed a Garden Oracle.
So happy I could help Valentina!! Love the term Garden Oracle!! Might have to use that somewhere in the future. Thanks for commenting!
Excellent presentation. Question, it’s still too early to plant outside, maybe 3 more weeks. Do I still need to keep my tomatoes and peppers under the grow lights?
It depends on how stocky and healthy they are. If they have 2 sets of true leaves and are looking good you don’t need to leave them under the lights constantly. You do need to harden them off however. Put them outside in the shade for an hour or so the first day and then gradually increase that until they acclimate to the outdoors. Depending on their health and the weather, they may need to go under the lights if they start getting leggy or spindly. Here is an article on how to harden off: https://farmtojar.com/tips-for-hardening-off-tomato-and-pepper-seedlings/
great information!!!
So glad to hear it might have helped with your tomatoes. Here’s to 2026!